
VPSサービスに自動バックアップ機能が無いため、Google Driveにバックアップしたいと考えている。
定期的にバックアップするための手順を教えて欲しい。
こんなお悩みを解決します。
VPSに限りませんが、マシン内にあるファイルのバックアップを行っていない方は、今すぐ仕組みを構築することをおすすめします。
なぜなら、私は過去に重要なデータを削除してしまい、復元に苦労した経験があるためです。
この記事では、Linuxマシン上のファイルをGoogle Driveにバックアップする方法について解説します。また、cronを用いて定期的に実行する方法もあわせて解説します。
記事を読み終えると、自動的にバックアップする仕組みを構築できるようになりますよ。
VPSサーバをまだ契約していない方
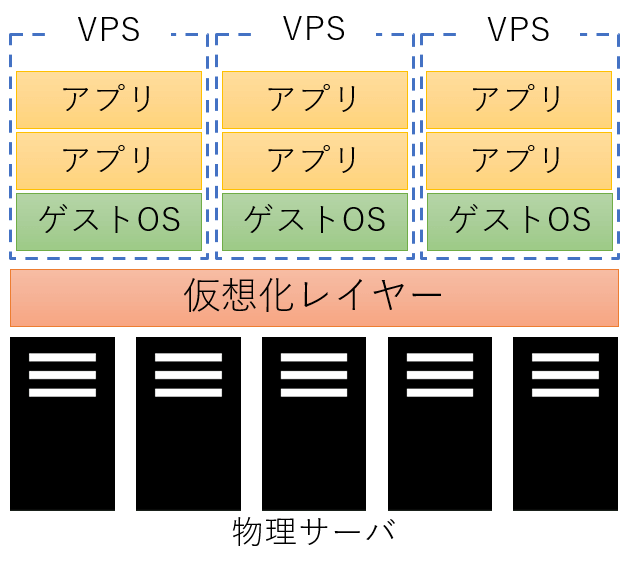
カスタマイズの自由度が高いサーバを求めている場合、仮想専用サーバ(VPS)を利用することをおすすめします。
また、まだVPSサーバを契約していない方は、以下の記事が参考になると思うので、ぜひご覧ください。
-
-
【比較】おすすめのVPS 5選
この記事で解決できること VPSって何? VPSを選ぶ際の考え方を知りたい! 各社のVPSを比較した ...
続きを見る
作業環境
今回は、VPS上のファイルをバックアップすることを想定します。また、以降の作業環境は以下のようになります。
| 項目 | 内容 |
|---|---|
| OS | Ubuntu 22.04.1 LTS |
事前準備
Google Driveへファイルをバックアップするために、以下の準備を行います。
rcloneコマンドのインストール- Google Drive APIの設定
rcloneコマンドのインストール
VPSサーバにアクセスし、以下のコマンドを実行します。
sudo apt update
sudo apt install -y rclone
Reading package lists... Done
Building dependency tree... Done
Reading state information... Done
The following packages were automatically installed and are no longer required:
  eatmydata libeatmydata1 libevent-pthreads-2.1-7 libopts25 python-babel-localedata python3-certifi python3-json-pointer python3-jsonpatch python3-jsonschema python3-markupsafe
  python3-pyrsistent python3-requests python3-urllib3 sntp usb-modeswitch-data
Use 'sudo apt autoremove' to remove them.
The following NEW packages will be installed:
  rclone
0 upgraded, 1 newly installed, 0 to remove and 85 not upgraded.
Need to get 11.7 MB of archives.
After this operation, 42.6 MB of additional disk space will be used.
Get:1 http://jp.archive.ubuntu.com/ubuntu jammy-updates/universe amd64 rclone amd64 1.53.3-4ubuntu1.22.04.2 [11.7 MB]
Fetched 11.7 MB in 3s (3,364 kB/s)
Selecting previously unselected package rclone.
(Reading database ... 74076 files and directories currently installed.)
Preparing to unpack .../rclone_1.53.3-4ubuntu1.22.04.2_amd64.deb ...
Unpacking rclone (1.53.3-4ubuntu1.22.04.2) ...
Setting up rclone (1.53.3-4ubuntu1.22.04.2) ...
Processing triggers for man-db (2.10.2-1) ...
Scanning processes...
Scanning candidates...
Scanning linux images...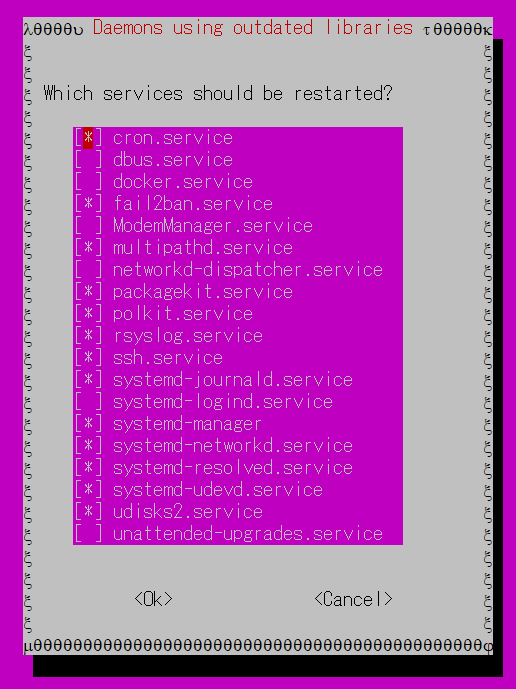
Running kernel seems to be up-to-date.途中で、サービスの再起動を促す画面が表示されるので、内容を確認した上で「OK」を押下します。
以降、私の環境では以下のようなコマンドが表示されました。
Restarting services...
 /etc/needrestart/restart.d/systemd-manager
 systemctl restart cron.service fail2ban.service multipathd.service packagekit.service polkit.service rsyslog.service ssh.service systemd-journald.service systemd-networkd.service systemd-resolved.service systemd-udevd.service udisks2.service
Service restarts being deferred:
 systemctl restart ModemManager.service
 /etc/needrestart/restart.d/dbus.service
 systemctl restart docker.service
 systemctl restart networkd-dispatcher.service
 systemctl restart systemd-logind.service
 systemctl restart unattended-upgrades.service

No containers need to be restarted.

No user sessions are running outdated binaries.

No VM guests are running outdated hypervisor (qemu) binaries on this host.
以下のコマンドを実行し、コマンドがインストールされていることを確認してください。
rclone version
rclone v1.53.3-DEV
- os/arch: linux/amd64
- go version: go1.18.1
Google Drive APIの設定
rcloneコマンドを実行する際に、Google Driveにアクセスできるようにするため、Google Drive APIの設定を行います。
Google Cloud上でのプロジェクト作成
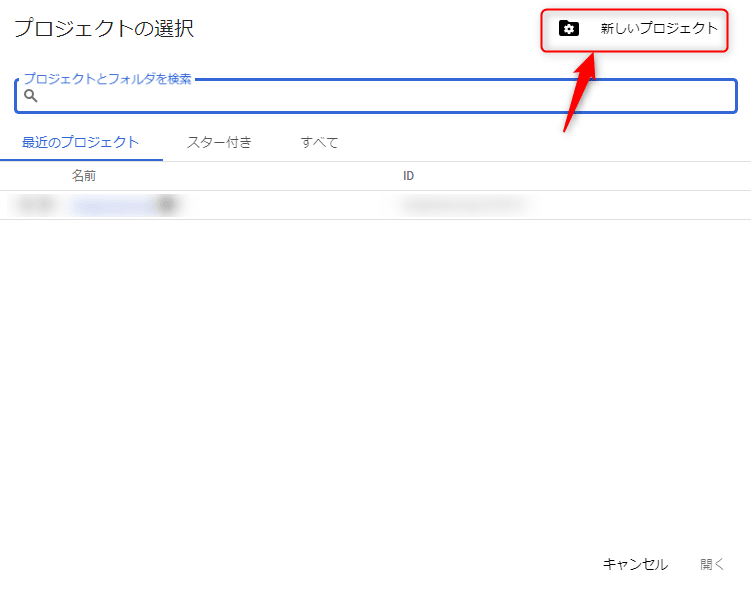
Google Cloud APIライブラリのページにアクセスし、左上にある「プロジェクトの選択」を押下します。

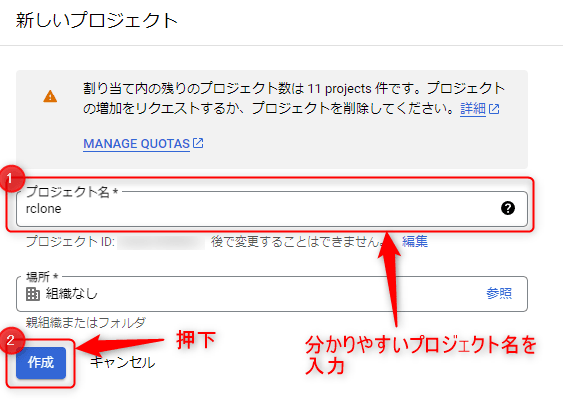
表示された画面の右上にある「新しいプロジェクト」を押下してください。
プロジェクト名を入力後、「作成」を押下します。ここでは、プロジェクト名を「rclone」としました。
Google Drive APIの追加
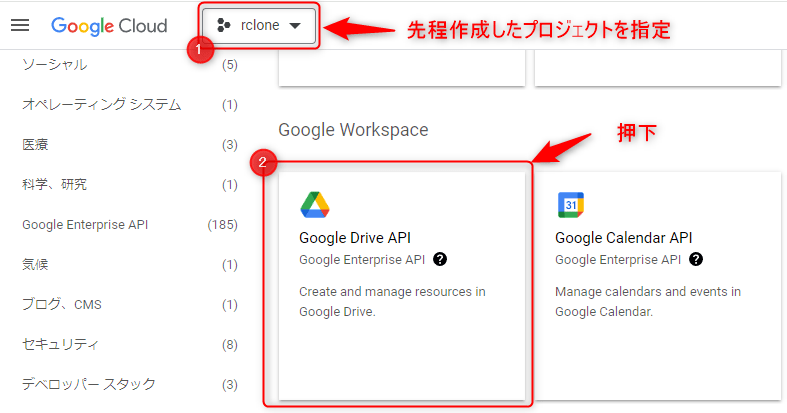
先程作成したプロジェクトを選択後、ページ中央の「Google Workspace」内にある「Google Drive API」を選択します。
画面が切り替わるので、「有効にする」を押下してください。
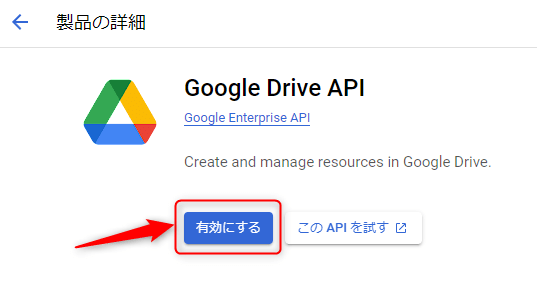
これで、Google Drive APIが有効化されます。
OAuth同意画面の設定
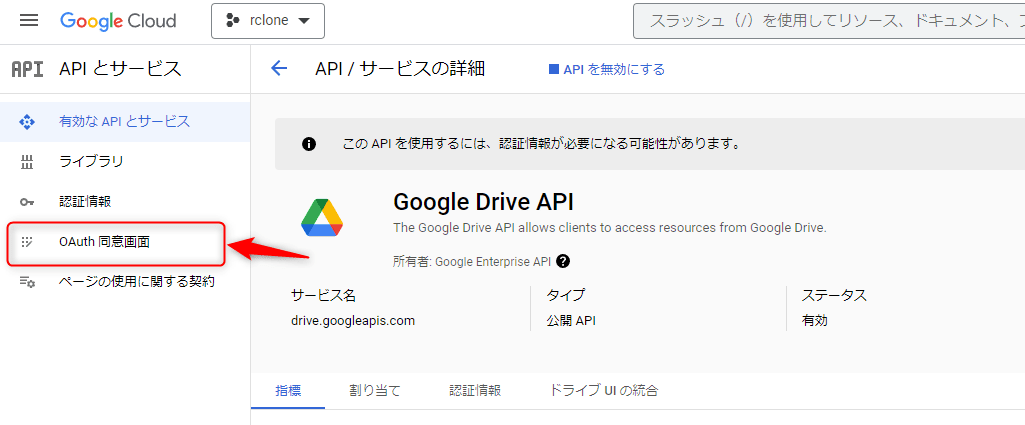
Google Drive APIを有効化すると、APIとサービスのページに遷移すると思います。
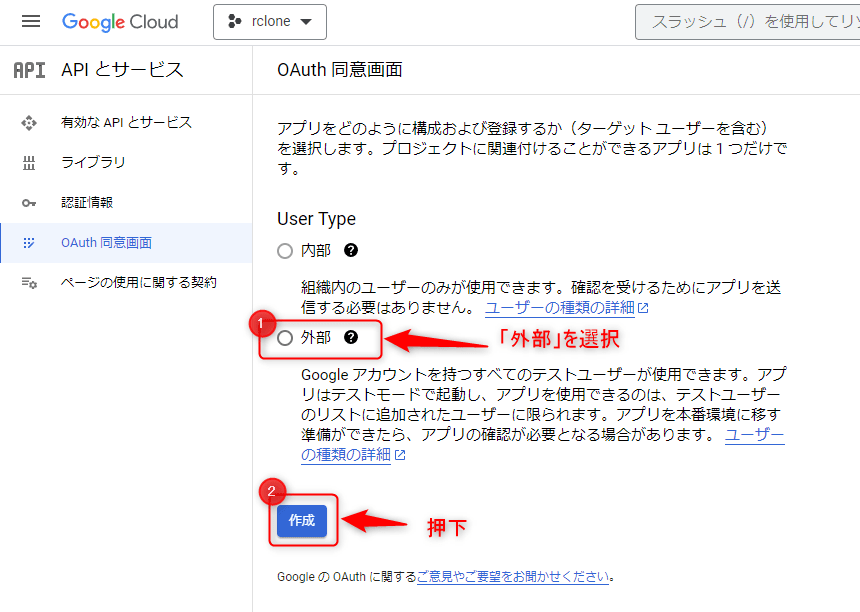
画面の左側にある「OAuth同意画面」を選択します。
遷移後の画面で、「User Type」を「外部」に設定した後、「作成」を押下します。
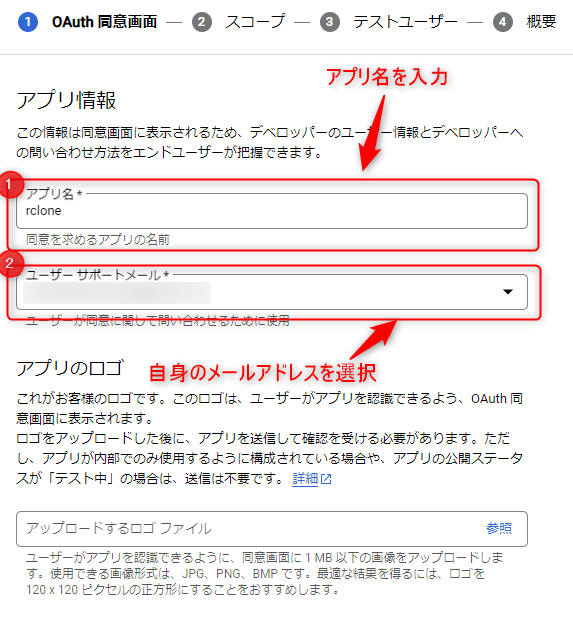
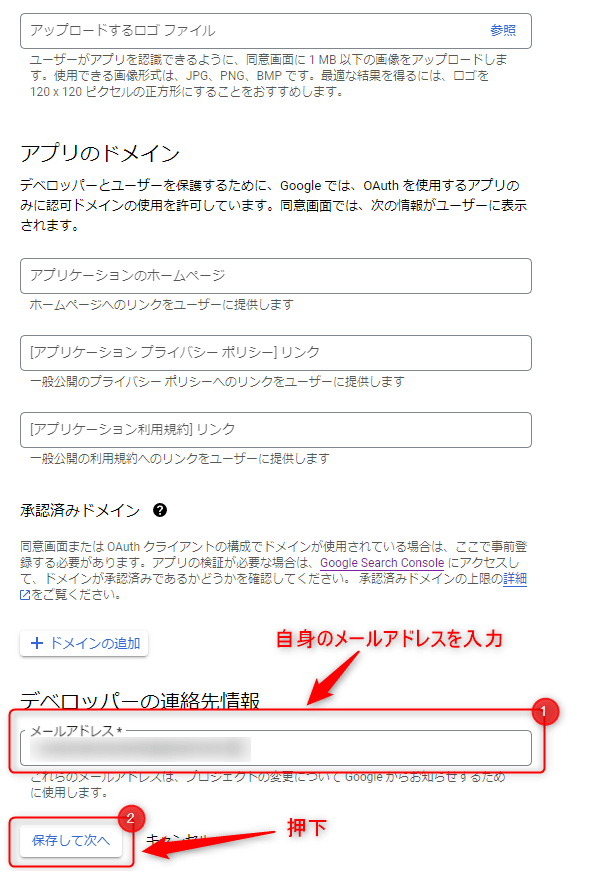
アプリ情報の画面では、以下を設定します。設定後、画面下部の「保存して次へ」を押下してください。
| 対象 | 設定内容 | 備考 |
|---|---|---|
| アプリ名 | 同意画面に表示されるアプリ名 | 今回は「rclone」とする。 |
| ユーザーサポートメール | 自身のメールアドレス | - |
| メールアドレス | 自身のメールアドレス | - |
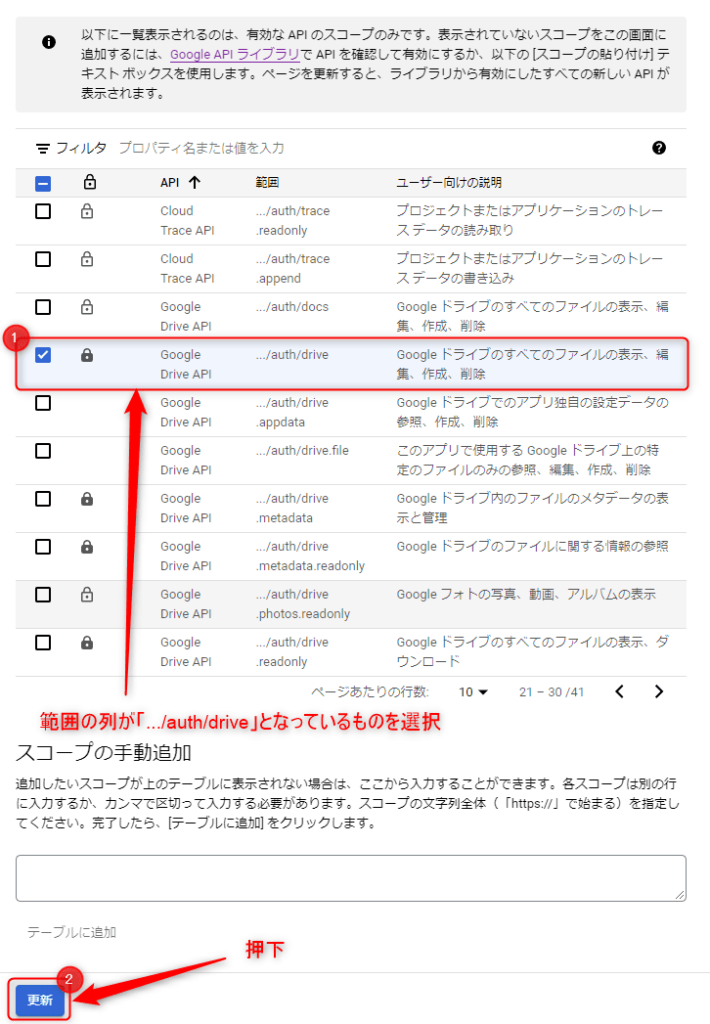
続いて、スコープを定義します。
画面上部にある「スコープを追加または削除」を押下します。
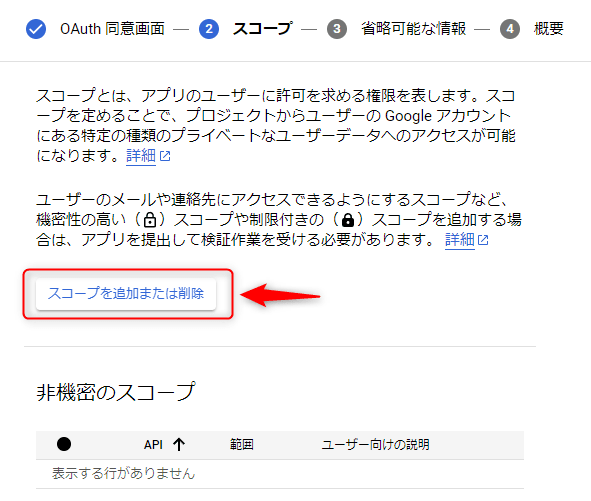
画面右側にAPIの一覧が表示されるため、下記のようになっている行を探し、チェックを付けた後、画面下部の「更新」を押下してください。
| 鍵マーク | API | 範囲 | ユーザ向けの説明 |
|---|---|---|---|
| 灰色の鍵マーク(制限付きのスコープ) | Google Drive API | .../auth/drive | Google ドライブのすべてのファイルの表示、編集、作成、削除 |
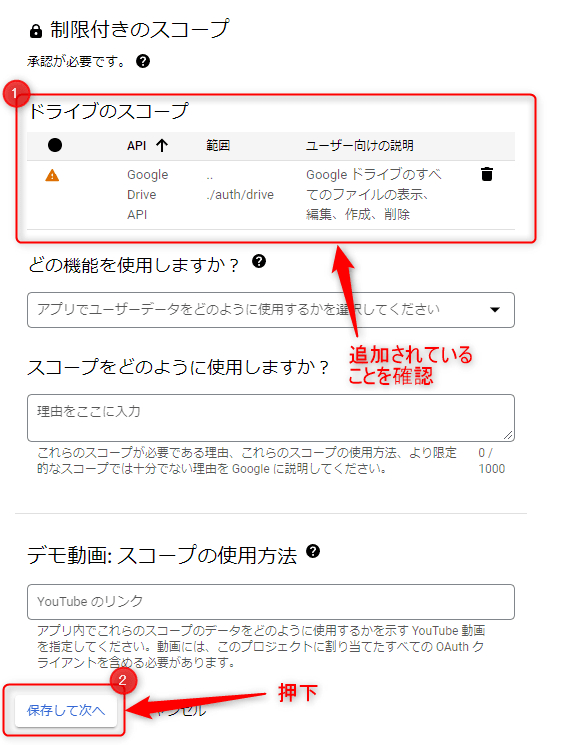
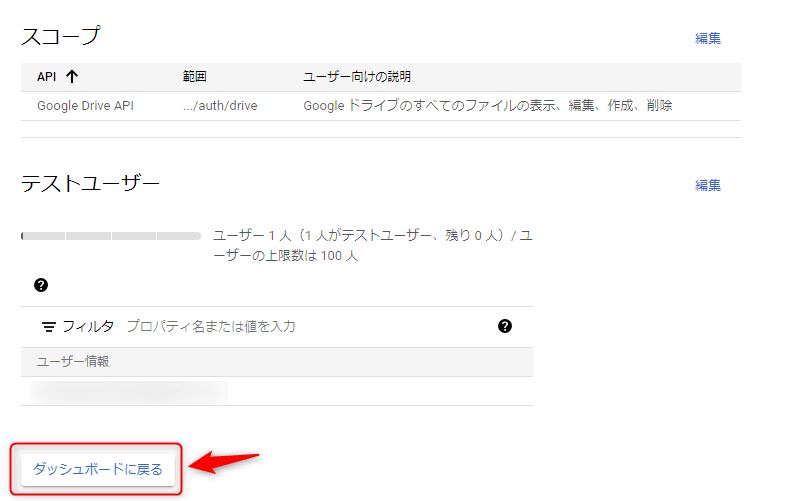
制限付きのスコープに「Google Drive API」が追加されていることを確認後、画面下部の「保存して次へ」を押下します。
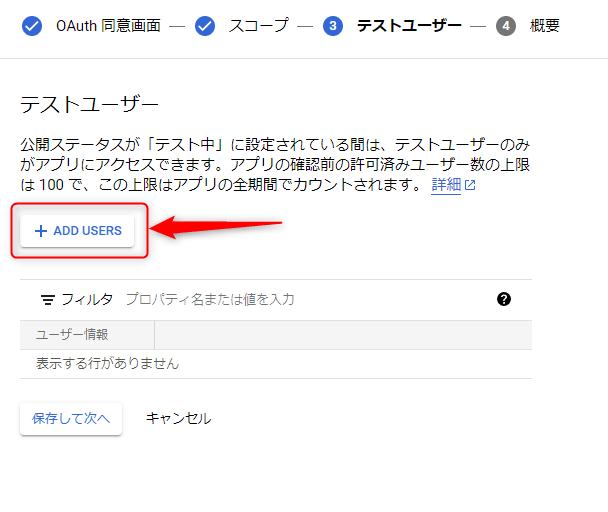
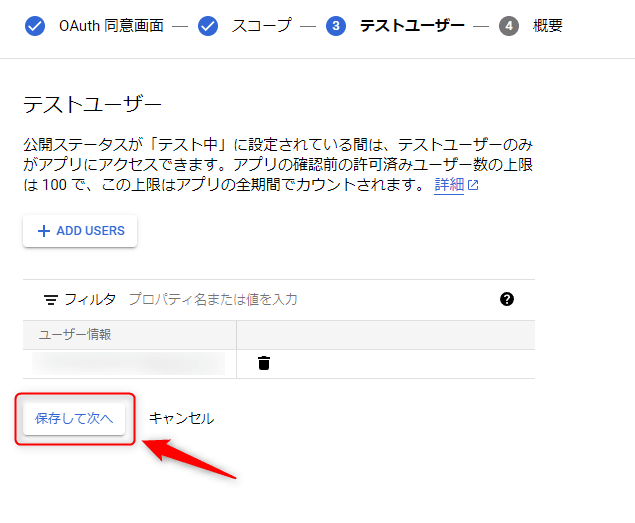
最後に、テストユーザーを追加します。
まず、「ADD USERS」を押下してください。
右側に表示された画面において、自身のGmailのアドレスを入力後、「追加」を押下します。
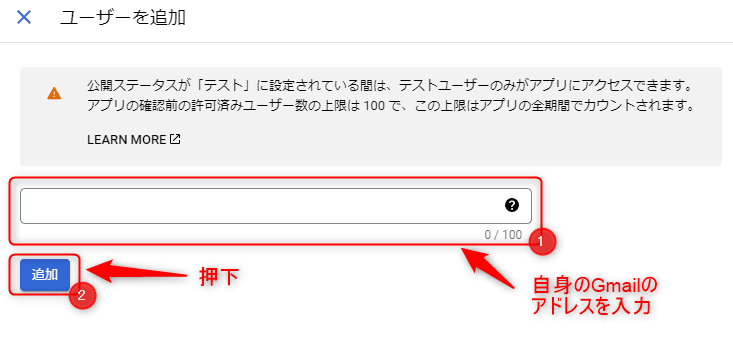
自身のGmailのアドレスが追加されていることを確認後、「保存して次へ」を押下してください。
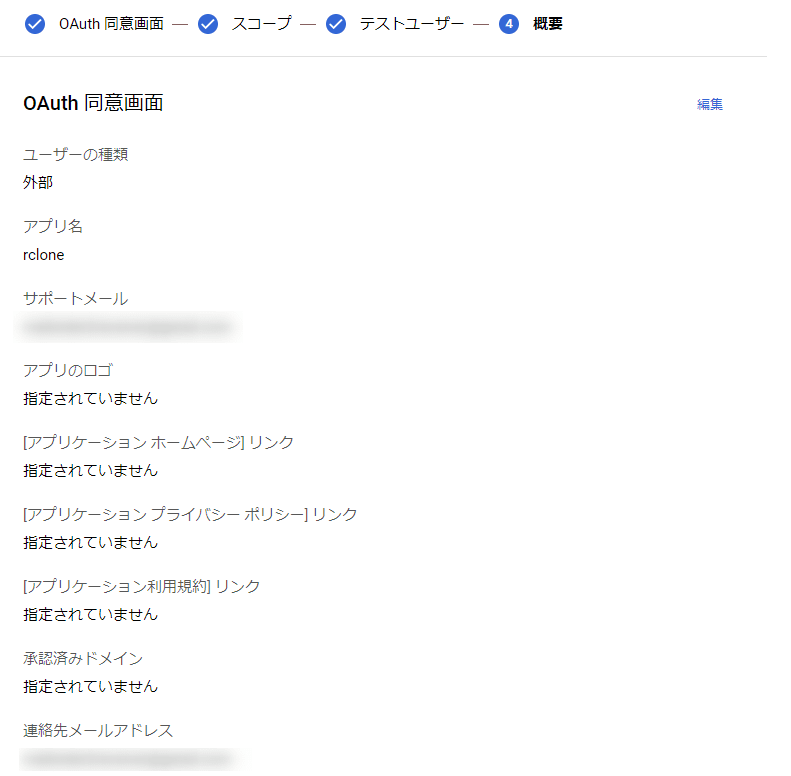
最終的な内容を確認後、「ダッシュボードに戻る」を押下します。
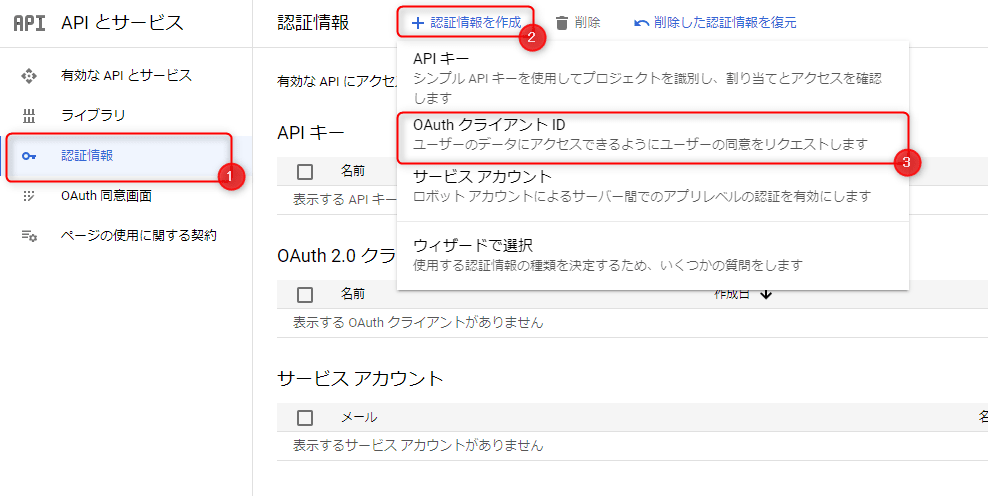
認証情報の生成
画面左側から、「認証情報」→「認証情報を作成」→「OAuth クライアントID」の順に押下してください。
表示された画面において、それぞれ以下のように設定後、「作成」を押下します。
| 項目 | 設定内容 | 備考 |
|---|---|---|
| アプリケーションの種類 | 「デスクトップアプリ」を指定する。 | - |
| 名前 | OAuth クライアントIDを識別するための名前を指定する。 | 今回は「rclone-oauth」とする。 |

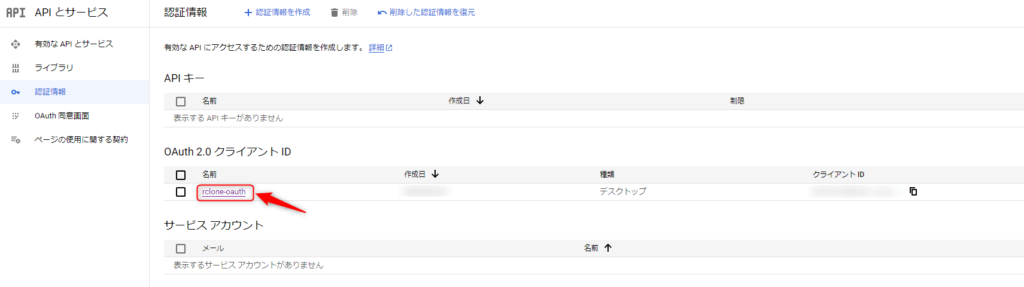
作成後に表示されるクライアントIDとクライアントシークレットは、後ほど参照します。
rcloneのconfig作成
VPSサーバ上で、Google Driveにアクセスするための設定を行っていきます。
設定を進めるにあたり、今回の設定内容を下記に示しておきます。
| 項目 | 内容 | 設定値 |
|---|---|---|
name | Google Driveにアクセスする際の名称 | google-backup |
Type of storage | 接続先のストレージの種類。今回は、Google Driveを指定する。 | drive |
scope | ファイルの追加・削除を行うため、古アクセス権を付与する。 | 1 |
client_id | Google Driveにアクセスする上でのクライアントID | OAuth認証情報を作成した際に取得したクライアントID |
client_secret | Google Driveにアクセスする上でのクライアントシークレット | OAuth認証情報を作成した際に取得したクライアントシークレット |
root_folder_id | Google Drive接続時のルートディレクトリ。特に指定しないため、空欄のままとする。 | (未設定) |
service_account_file | Google Driveに接続する際のサービスアカウントの認証情報。使用しないため、空欄のままとする。 | (未設定) |
Edit advanced config | advanced configの編集。設定不要のため、n(No)を指定する。 | n |
Use auto config | auto configの使用。rcloneをサーバ上で動作させるため、n(No)を指定する。 | n |
team drive | 共有フォルダに対するconfigを行う。今回は、共有フォルダは対象にしないため、n(No)を指定する。 | n |
以降では、コマンドを実行し、rcloneのconfigを作成していきます。
configの新規作成と接続先の指定
最初はconfigがないため、「New remote」である「n」を入力してください。
rclone config
No remotes found - make a new one
n) New remote
s) Set configuration password
q) Quit config
n/s/q> n
そして、Google Driveにアクセスする際の名称(configの名称)を聞かれるため、好きな名称を指定します。ここでは、「google-backup」としました。
name> google-backupストレージの種類の選択
ストレージの種類を選択するように促されるため、「drive」と入力します。
Type of storage to configure.
Enter a string value. Press Enter for the default ("").
Choose a number from below, or type in your own value
 1 / 1Fichier
#
# 中略
#
Storage> drive
クライアントID・クライアントシークレットの設定
APIとサービスのページにアクセスし、「OAuth 2.0 クライアント ID」にあるリンクを押下後に表示される「クライアントID」と「クライアントシークレット」を控えておいてください。
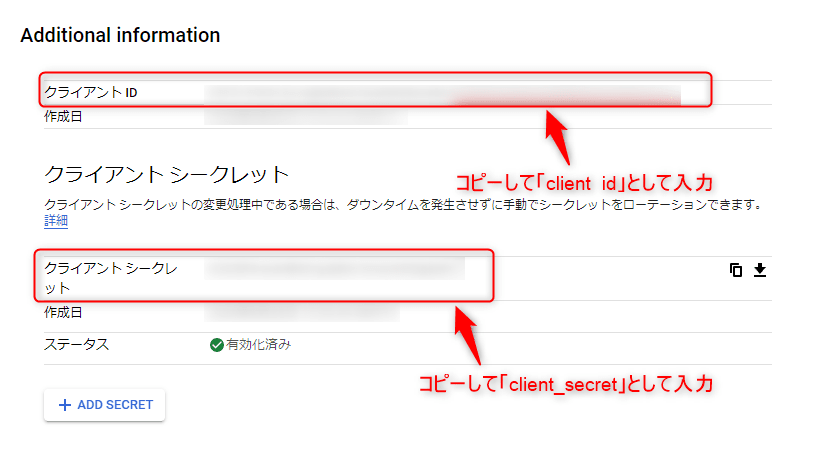
ターミナルには、以下のような画面が表示されるので、それぞれ入力します。
** See help for drive backend at: https://rclone.org/drive/ **

Google Application Client Id
Setting your own is recommended.
See https://rclone.org/drive/#making-your-own-client-id for how to create your own.
If you leave this blank, it will use an internal key which is low performance.
Enter a string value. Press Enter for the default ("").
client_id> ***** # 先ほど取得したクライアントID
OAuth Client Secret
Leave blank normally.
Enter a string value. Press Enter for the default ("").
client_secret> ***** # 先ほど取得したクライアントシークレット
スコープとルートディレクトリの設定
スコープを確認されるため、「1」を入力します。
Scope that rclone should use when requesting access from drive.
Enter a string value. Press Enter for the default ("").
Choose a number from below, or type in your own value
 1 / Full access all files, excluding Application Data Folder.
   \ "drive"
 2 / Read-only access to file metadata and file contents.
   \ "drive.readonly"
   / Access to files created by rclone only.
 3 | These are visible in the drive website.
   | File authorization is revoked when the user deauthorizes the app.
   \ "drive.file"
   / Allows read and write access to the Application Data folder.
 4 | This is not visible in the drive website.
   \ "drive.appfolder"
   / Allows read-only access to file metadata but
 5 | does not allow any access to read or download file content.
   \ "drive.metadata.readonly"
scope> 1root_folder_idとservice_account_fileは使用しないため、未指定の状態でEnterキーを押下してください。
ID of the root folder
Leave blank normally.

Fill in to access "Computers" folders (see docs), or for rclone to use
a non root folder as its starting point.

Enter a string value. Press Enter for the default ("").
root_folder_id> # 何も入力せずにEnterキーを押下
Service Account Credentials JSON file path
Leave blank normally.
Needed only if you want use SA instead of interactive login.

Leading `~` will be expanded in the file name as will environment variables such as `${RCLONE_CONFIG_DIR}`.

Enter a string value. Press Enter for the default ("").
service_account_file> # 何も入力せずにEnterキーを押下
configの設定
advanced configの編集は不要なため、「n」を入力します。
Edit advanced config? (y/n)
y) Yes
n) No (default)
y/n> n一方、rcloneコマンドはサーバ上で動作させているため、auto configが利用できません。
このため、「n」を入力し、表示されるリンクをホストマシンのブラウザで開きます。
Remote config
Use auto config?
 * Say Y if not sure
 * Say N if you are working on a remote or headless machine
y) Yes (default)
n) No
y/n> n
Please go to the following link: https://accounts.google.com/o/oauth2/auth?access_type=offline&client_id=*****&redirect_uri=*****
# 上記のリンクをコピーしてブラウザで開く(各自の環境によって異なるため、詳細はターミナルに表示されたリンク参照)
認証情報に対する検証
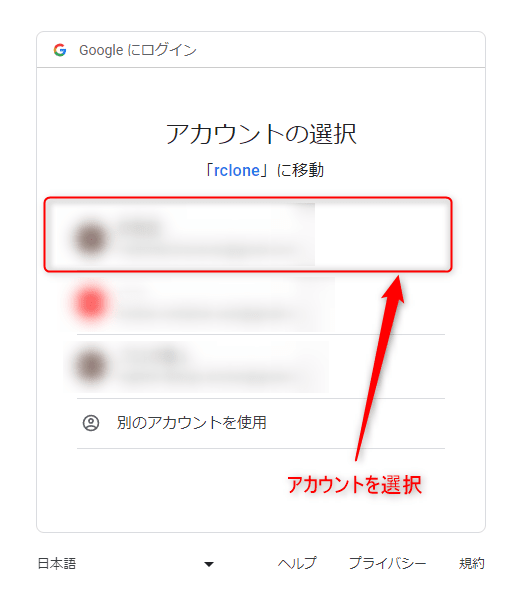
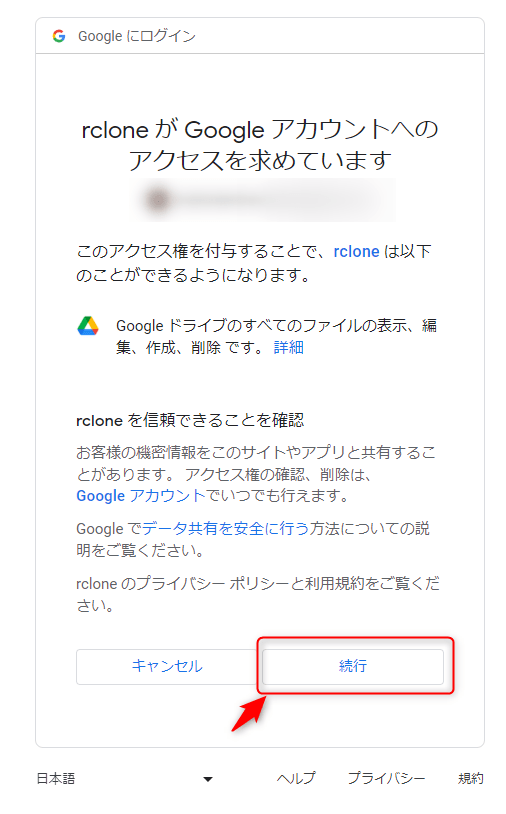
アクセス後、ログインを求められるので該当するアカウントでログインしてください。
「続行」を押下します。
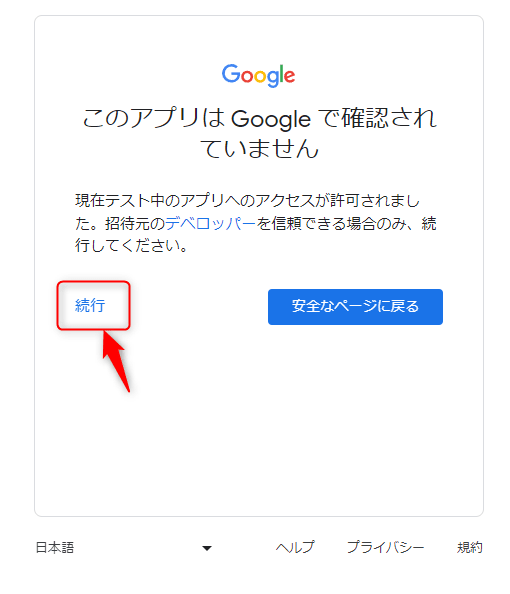
アクセス権を付与するリソースについて説明されるため、内容を確認後、「続行」を押下してください。
最後に認証コードが表示されるため、コピーします。
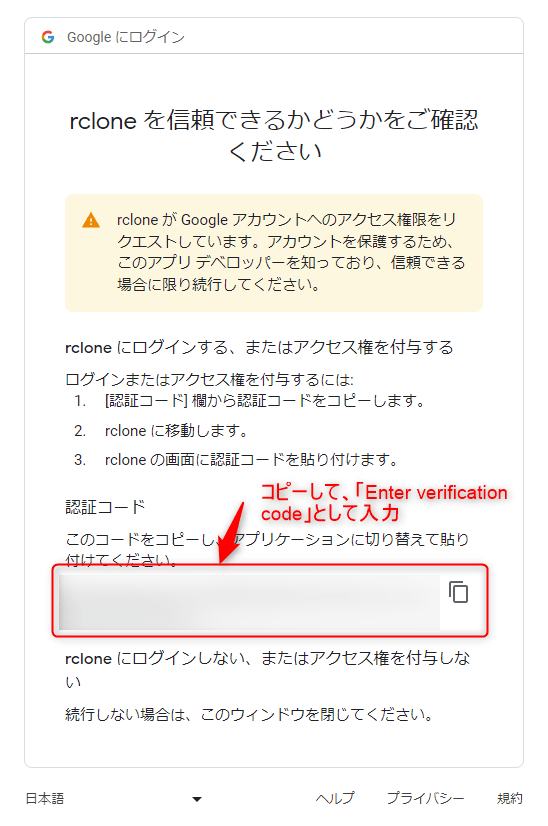
Log in and authorize rclone for access
Enter verification code> ***** # 先程コピーした認証コードを入力
共有フォルダの設定
今回は、共有フォルダを利用しないため、「n」を入力します。
Configure this as a team drive?
y) Yes
n) No (default)
y/n> n
設定内容の確認・コマンド終了
設定内容の一覧が表示されるため、内容を確認後、「y」を入力してください。
--------------------
[google-backup]
client_id = *****
client_secret = *****
scope = drive
token = {"access_token":"*****","token_type":"*****","refresh_token":"*****","expiry":"*****"}
--------------------
y) Yes this is OK (default)
e) Edit this remote
d) Delete this remote
y/e/d> y一通り設定は完了したため、「q」を入力してコマンドを終了します。
Current remotes:

Name                 Type
====                 ====
google-backup        drive

e) Edit existing remote
n) New remote
d) Delete remote
r) Rename remote
c) Copy remote
s) Set configuration password
q) Quit config
e/n/d/r/c/s/q> q
動作確認
以下のコマンドを実行し、Google Drive上のファイルが表示されることを確認してください。
rclone lsd google-backup:
          -1 1933-01-01 12:34:56        -1 Colab Notebooks
          -1 1999-01-01 01:23:45        -1 ConoHaWING
          -1 1999-01-01 01:23:45        -1 ConoHaWING/backup-vps-settings
cronによる定期実行
今回は簡単のため、特定のディレクトリ以下にあるディレクトリのみをコピーし、圧縮後、Google Driveにコピーする方針とします。
例えば、私のホームディレクトリ以下は、以下のようになっているため、この場合、下記2つのディレクトリがバックアップ対象となります。
ddns-settingsvpnaccess-wireguard-nginx
${HOME}/
|-- ddns-settings/
|-- mydns.log
`-- vpnaccess-wireguard-nginx/
    |-- LICENSE
    |-- README.md
    |-- docker-compose.yml
    |-- envs/
    |-- nginx/
    |-- wireguard/
    `-- wrapper.sh
定期実行用のshell script作成
非常にシンプルですが、定期実行用のshell scriptを作成したので、公開します。
実際に運用する際は、rsyncコマンド等を実行し差分バックアップを行う方が良いです。
#!/bin/bash

target_dir=
output_dir=
del_days=7
is_dryrun=0
remote_path=/
readonly HOMEDIR=/home/yuruto      # 環境に応じて適切に設定する
readonly config_name=google-backup
readonly DATECMD=/usr/bin/date
readonly MKDIRCMD=/usr/bin/mkdir
readonly GREPCMD=/usr/bin/grep
readonly CPCMD=/usr/bin/cp
readonly TARCMD=/usr/bin/tar
readonly RCLONECMD=/usr/bin/rclone # 環境に応じて適切に設定する
readonly RMCMD=/usr/bin/rm

Usage() {
    echo "$0 [option] -t target_dir"
    echo "  -t: set 'target directory'"
    echo "  -o: set 'output directory'"
    echo "  -r: set 'remote path'"
    echo "  -p: set dry-run option"
    echo "  -d: set number of days elapsed at time of deletion"
    echo "ex) $0 -t /home/yuruto -p"
    echo "ex) $0 -t /home/yuruto -o backup-test -d 14"
    exit 0
}

while [ -n "$1" ]; do
    case "$1" in
        -t | --target )
            target_dir="$2"
            shift
            shift
            ;;

        -o | --output )
            output_dir="$2"
            shift
            shift
            ;;

        -r | --remote-path )
            remote_path="$2"
            shift
            shift
            ;;

        -p | --dry-run )
            is_dryrun=1
            shift
            ;;

        -d | --delete-after-days )
            # Delete backup files older than `del_days` from today
            del_days="$2"
            shift
            shift
            ;;

        -h | --help )
            Usage
            shift
            ;;

        * )
            shift
            ;;
    esac
done

# Check `target_dir` value
if [ -z "${target_dir}" ] || [ ! -e ${target_dir} ]; then
    echo "Error: Invalid target directory(target: ${target_dir})"
    exit 0
fi
# Check `output_dir` value
if [ -z "${output_dir}" ]; then
    current_date=$(${DATECMD} +"%Y%m%d")
    output_dir=${HOMEDIR}/backup${current_date}
elif [ ! -e "${output_dir}" ]; then
    output_dir=${HOMEDIR}/${output_dir}
fi
# Calculate `del_days` ago
_target_date=$(${DATECMD} +"%Y/%m/%d" --date "${del_days} day ago")
threshold=$(${DATECMD} --date "${_target_date}" +%s)
# Setup dry-run
if [ ${is_dryrun} -eq 1 ]; then
    option_rclone="--dry-run"
else
    option_rclone=""
fi

# ================
# = main routine =
# ================
echo "=== Parameters ==="
echo "  dryrun: ${is_dryrun}"
echo "  target: ${target_dir}"
echo "  output: ${output_dir}"
echo "  threshold: ${threshold}"
echo "=================="

run_cmd(){
    local _cmd="$1"
    local _date=$(${DATECMD} +"%Y/%m/%d %H:%M:%S")

    if [ ${is_dryrun} -eq 1 ]; then
        echo "${_date} [dry-run] ${_cmd}"
    else
        echo "${_date} ${_cmd}"
        eval "${_cmd}"
    fi
}

# Step1: Create output directory if it does not exist.
if [ ! -e ${output_dir} ]; then
    run_cmd "${MKDIRCMD} -p ${output_dir}"
fi
# Step2: Copy data to output directory.
ls -vF ${target_dir} | ${GREPCMD} "/$" | ${GREPCMD} -v "${output_dir}" | while read item; do
    run_cmd "${CPCMD} -ar ${target_dir}/${item} ${output_dir}"
done
# Step3: Compress output directory.
if echo ${output_dir} | ${GREPCMD} -q "/$"; then
    tar_file=${output_dir%/*}.tar.gz
else
    tar_file=${output_dir}.tar.gz
fi
run_cmd "${TARCMD} zcvf ${tar_file} ${output_dir}"
# Step4: Search for old files and delete them if they exceed the threshold.
${RCLONECMD} lsl ${config_name}:${remote_path} --max-depth 1 | while read _dummy1 updated_at _dummy2 remote_file _rests; do
    updated_sec=$(${DATECMD} --date "${updated_at}" +%s)

    # Check threshold
    if [ ${updated_sec} -lt ${threshold} ]; then
        # Delete remote_file
        echo "Delete remote file: ${remote_path}/${remote_file}"
        ${RCLONECMD} ${option_rclone} delete ${config_name}:${remote_path}/${remote_file}
    fi
done
# Step5: Copy backup file to remote path
run_cmd "${RCLONECMD} copy ${tar_file} ${config_name}:${remote_path}"
# Step6: Delete temporary file and directory
run_cmd "${RMCMD} -rf ${output_dir} ${tar_file}"
オプションの説明
以下のオプションを設定できます。
| オプション | 内容 | 設定例 |
|---|---|---|
-t, --target | バックアップ先 | -t /home/yuruto |
-o, --output | バックアップ時のディレクトリ名 | -o backup-test |
-r, --remote-path | Google Drive上のファイルパス | -r ConoHaWING/backup-vps-settings |
-p, --dry-run | dry-runフラグ | -p |
-d, --delete-after-days | 削除対象のファイルの経過日数 | -d 14 |
-h, --help | コマンドの実行方法の表示 | -h |
実行例
上記のshell scriptをauto_backup.shとして保存した場合の実行例を示します。
まず、dry-runの場合の例を以下に示します。
./auto_backup.sh -t ${HOME} -r ConoHaWING/backup-vps-settings -o backup-test -p
=== Parameters ===
  dryrun: 0
  target: /home/yuruto
  output: /home/yuruto/backup-test
  threshold: 945961200
==================
1999/12/31 23:59:50 [dry-run] /usr/bin/mkdir -p /home/yuruto/backup-test
1999/12/31 23:59:50 [dry-run] /usr/bin/cp -ar /home/yuruto/ddns-settings/ /home/yuruto/backup-test
1999/12/31 23:59:51 [dry-run] /usr/bin/cp -ar /home/yuruto/vpnaccess-wireguard-nginx/ /home/yuruto/backup-test
1999/12/31 23:59:51 [dry-run] /usr/bin/tar zcvf /home/yuruto/backup-test.tar.gz /home/yuruto/backup-test
1999/12/31 23:59:51 [dry-run] /usr/bin/rclone copy /home/yuruto/backup-test.tar.gz google-backup:ConoHaWING/backup-vps-settings
1999/12/31 23:59:51 [dry-run] /usr/bin/rm -rf /home/yuruto/backup-test /home/yuruto/backup-test.tar.gz
次に、実際に実行した場合の例を示します。
./auto_backup.sh -t ${HOME} -r ConoHaWING/backup-vps-settings -o backup-test
=== Parameters ===
  dryrun: 0
  target: /home/yuruto
  output: /home/yuruto/backup-test
  threshold: 945961200
==================
1999/12/31 23:59:56 /usr/bin/mkdir -p /home/yuruto/backup-test
1999/12/31 23:59:56 /usr/bin/cp -ar /home/yuruto/ddns-settings/ /home/yuruto/backup-test
1999/12/31 23:59:56 /usr/bin/cp -ar /home/yuruto/vpnaccess-wireguard-nginx/ /home/yuruto/backup-test
1999/12/31 23:59:56 /usr/bin/tar zcvf /home/yuruto/backup-test.tar.gz /home/yuruto/backup-test
backup-test/
backup-test/ddns-settings/
backup-test/ddns-settings/update_mydns_ipv4.sh
backup-test/ddns-settings/setup.cron
backup-test/vpnaccess-wireguard-nginx/
backup-test/vpnaccess-wireguard-nginx/LICENSE
# 中略
backup-test/vpnaccess-wireguard-nginx/.git/COMMIT_EDITMSG
1999/12/31 23:59:56 /usr/bin/rclone copy /home/yuruto/backup-test.tar.gz google-backup:ConoHaWING/backup-vps-settings
1999/12/31 23:59:57 /usr/bin/rm -rf /home/yuruto/backup-test /home/yuruto/backup-test.tar.gz
また、Google Drive上の該当ディレクトリを確認するとバックアップファイルが確認されていることが分かると思います。

cronによる定期実行
後は、以下のようなcronの設定を行うことで、定期的に実行することができます。(-oオプションなしの場合、実行日の日付が指定されるようになっています。)
SHELL=/bin/bash
PATH=/sbin:/bin:/usr/sbin:/usr/bin
MAILTO=""
HOME=/home/yuruto
1 0 * * *  ${HOME}/auto_backup.sh -t /home/yuruto -r ConoHaWING/backup-vps-settings
まとめ
今回は、rcloneを使ってVPS上のデータをGoogleDriveにバックアップする方法について解説しました。
また、簡易的なshell scriptを作成し、定期実行するための仕組みを構築しました。
このような対応を行うことで、自動バックアップ機能が無い場合でも安心して運用することができますね。
VPSサーバをまだ契約していない方
カスタマイズの自由度が高いサーバを求めている場合、仮想専用サーバ(VPS)を利用することをおすすめします。
また、まだVPSサーバを契約していない方は、以下の記事が参考になると思うので、ぜひご覧ください。
-
-
【比較】おすすめのVPS 5選
この記事で解決できること VPSって何? VPSを選ぶ際の考え方を知りたい! 各社のVPSを比較した ...
続きを見る
PyDrive2を用いたバージョンの記事をまとめました。
-
-
【Python】PyDrive2を用いてVPS上のデータをGoogleDriveにバックアップする方法を解説
こんなお悩みを解決します。 以前の記事で、rcloneを用いてGoogle Driveにバックアップ ...
続きを見る